Welcome to my page with handmade mask information.
Maybe you’re here because Google sent you, but more likely you’re here because you’re looking for:
- instructions to measure so I can sew you a mask
- care instructions for your mask
Click either of those links to jump directly to the section in question.
First, and very importantly!
I’m not a doctor. Or a lawyer. I make no claims or warranties about the masks that I sew, the filter media I’m providing, or any of the information that I have on this page. The information provided on this page is my personal opinion and has no implied or real medical validity.
TLDR: I’m not saying using this mask guarantees you won’t get sick or make someone sick.
I urge you to get your health information from trusted, reputable sources and to follow government guidance when it comes to protecting yourself and others.
Why Masks?
Scientists and governments around the world seem to agree on this one fact: physical distancing and hand washing are our best defences against the spread of the coronavirus that causes Covid-19.
But there are times where physical distancing is difficult to maintain. And as we’ve heard, some stores such as Costco (in the US), T&T, and Starbucks are requiring or requesting that customers wear a face covering in the store.
The Public Health Agency of Canada says that wearing a non-medical face mask can help prevent the spread of your infectious respiratory droplets. Meaning that by wearing a non-medical mask you can make sure you don’t make others sick with any of your germs. So wear a mask to help protect your granny, your grocer, or your girlfriend. Do your part.
In the USA, the Center for Disease Control (CDC) recommends wearing a face covering to help slow the spread of Covid-19. In particular, they call out the fact that this can be helpful in situations where physical distancing is hard to maintain. They have a number of sewable and no-sew options on their website as well as some basic care instructions.
What kind of mask does Brigitte make?
I tried a couple different types of masks and a few varieties of fabric and filter material. In the end, because it’s not too hard to sew and has the best chance (that I’ve found) of a good fit, I’m using a modified version of the Olson Mask.
I made the decision to use this mask after trying a similar one that was complicated to sew, and after watching this video from The Fabric Patch (who made the video after collectively making more than 167,000 masks!). Using a suggestion from the end of that video, I’m using a modification to the Olson mask pattern that was created by engineer Jesse Killion. Jesse’s version of the mask comes in 8 sizes for the best possible fit. I’m further modifying that pattern a tiny bit to add a filter pocket, as many others have done for the Olson mask.
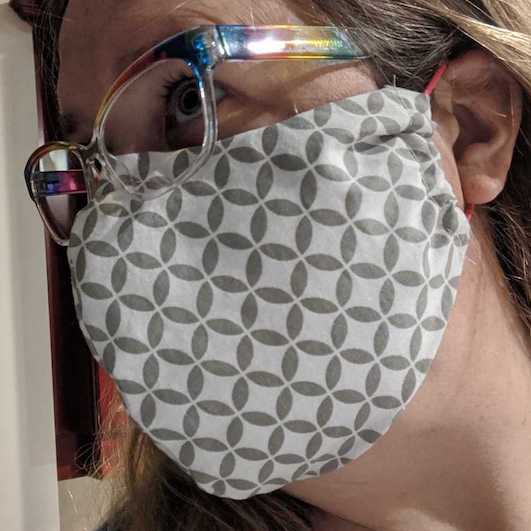
This is what my mask looks like when I wear it. Notice it has a snug fit along the jaw (and would have an even better fit at the nose if I had the nose wire in place).
How do I measure my face for a mask?
The Jesse Killion fabric face mask needs two measurements for a good fit. The Fabric Patch’s video demonstrates this really well. It’s queued up at the right spot if you click the link.
If you’d like me to make you a mask please take the following measurements, in inches.
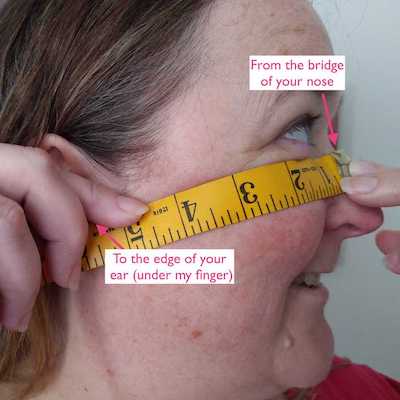
- Ear: From the bridge of your nose (wear glasses would rest) to the cheekbone in front of your ear.
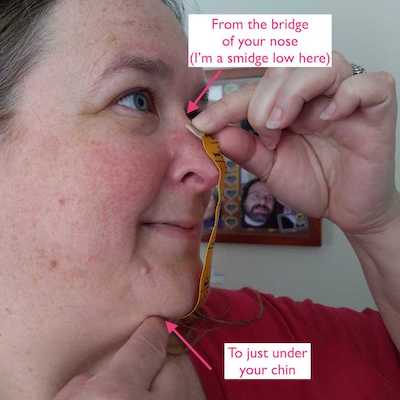
- Chin: From the bridge of your nose to just under your chin (I measure to the spot where my chin bone starts to dip into my chin).
The mask sizes go from 4.375” to 6” for the ear measurements and from 4.75” to 6.5” for the chin measurement. For comparison, my ear measurement is 5.5” and my chin is 6”. If you’re measurement comes out below or above the available ranges, check the video or images below to make sure you’re measuring correctly.
Here are a few glamour shots of me measuring myself for a mask.
I know, the pictures here aren’t great.
Forgive the fact that my finger is a bit over where I’d normally measure to on the ear measurement and that the tape is a bit low on my nose for the chin measurement.
(The ear measurement goes to a finger or two away from the edge of your ear.)
Look at where the arrows point, that’s the area to measure.
And if you’re still not sure, try the video again.
Remember that the measurements I’m asking you for will determine the mask size and don’t necessarily indicate where it will sit when it’s on your face. Mine goes further around my chin than my measurement point, for example.
Note: If you don’t have a flexible measuring tape, take a piece of non-stretchy string or even a piece of paper to do the measurements, then lay the makeshift measuring tape against a ruler to get your results.
When do I get my mask?
So far it seems to take me around 4-5 hours to cut, sew, and package about 10 masks. There are optimizations that come with quantitiy, so each time I get a new “size” request, I’m making several of that size at once. This means I might already have your size made, and therefore you might be able to pick it up sooner than if I need to cut and sew a new batch of masks.
For most people, I’m offering a contactless pick up at my house. We’ll organize a pick up time and I’ll have your mask in a baggie (with your name on it) outside on my front porch. You’ll pick it up and go.
What do I get with the mask?
The Olson-style mask that I’m sewing has the following characteristics:
- An “outside” or front piece of 100% cotton fabric (newly purchased bed sheet fabric was the least costly option I could find. I ran these through the sanitize wash and dryer cycle in my steam washer and dryer.)
- A two part “inside” of the same 100% cotton fabric (with the same washing treatment), usually with the mouth area in a different colour or pattern than the rest of the mask
- The “inside” has a pocket where you can place a filter
- The “inside” also has a sleeve for a nose wire to help fit the mask tightly to your face
I’m also providing (if my supplies allow it):
- a pipe cleaner that you can twist into a nose wire, see below for instructions
- 2 Filti Fabric filters that you can put inside the filter pocket, see below for instructions and be sure to read the disclaimer at the bottom Filti’s product page.
While I’m working on the masks I have clean hands and clean work surfaces. I put each finished mask and a pipe cleaner in a ziploc style baggie. I add the filter media in a separate internal baggie.
Important note: See my disclaimer above (recap: I’m not a doctor or a lawyer). Also note the disclaimer at the bottom Filti’s product page. Yes, I know I’ve said that part before. I want to be really clear, because at some point someone who I don’t know personally will read this, and I don’t want anyone to think that I know what I’m talking about. Because I don’t.
I’ve been asked what am I charging for the masks. The simple answer is nothing. Pay it forward with an act of kindness.
If you really, REALLY want to help out. And you’re someone who just can’t take no for an answer…. Let’s talk about how you could help me with my next supplies order.
How should I use my mask?
First, wash it.
Take it out of the baggie and wash the mask either in your washing machine or by hand, rubbing it with soap like you’d do when washing your hands. You can lay it out to dry, or use the dryer. The mask will hold up longer with hand washing. Be careful what soaps you’re using, you’ll be inhaling those scents when you next don the mask.
Next, figure out which part goes over your nose and optionally add the wire piece and filter.
There are lots of mask handling guides online (like this one from the Government of Canada website).
Follow the steps there to ensure you’re safely donning and doffing your mask.
(As an added bonus, you’ll be able to say you know the words don and doff.)
Lastly, wash it or otherwise sanitize your mask again when you get home.
Here’s how I use my mask:
I put my mask on before I get in the car when leaving my house, and I leave it on until I return. Even if it’s uncomfortable, I don’t remove it between errands.
I use the “glitter” analogy when it comes to visualizing germs. Anyone who’s ever done any craft (or other “activity”) with glitter knows how easy it is to transfer glitter and how hard it is to remove it!
So when I’m out and about, I imagine all that the visible parts of my mask are covered in sparkly glitter (and the mouth-side is covered with my own germ-laden glitter). I don’t touch the mask, take it off, or change it position between errands because I don’t want that glitter to end up on my hands, clothes, car, or anything else around me.
Which part of the mask goes over my nose?
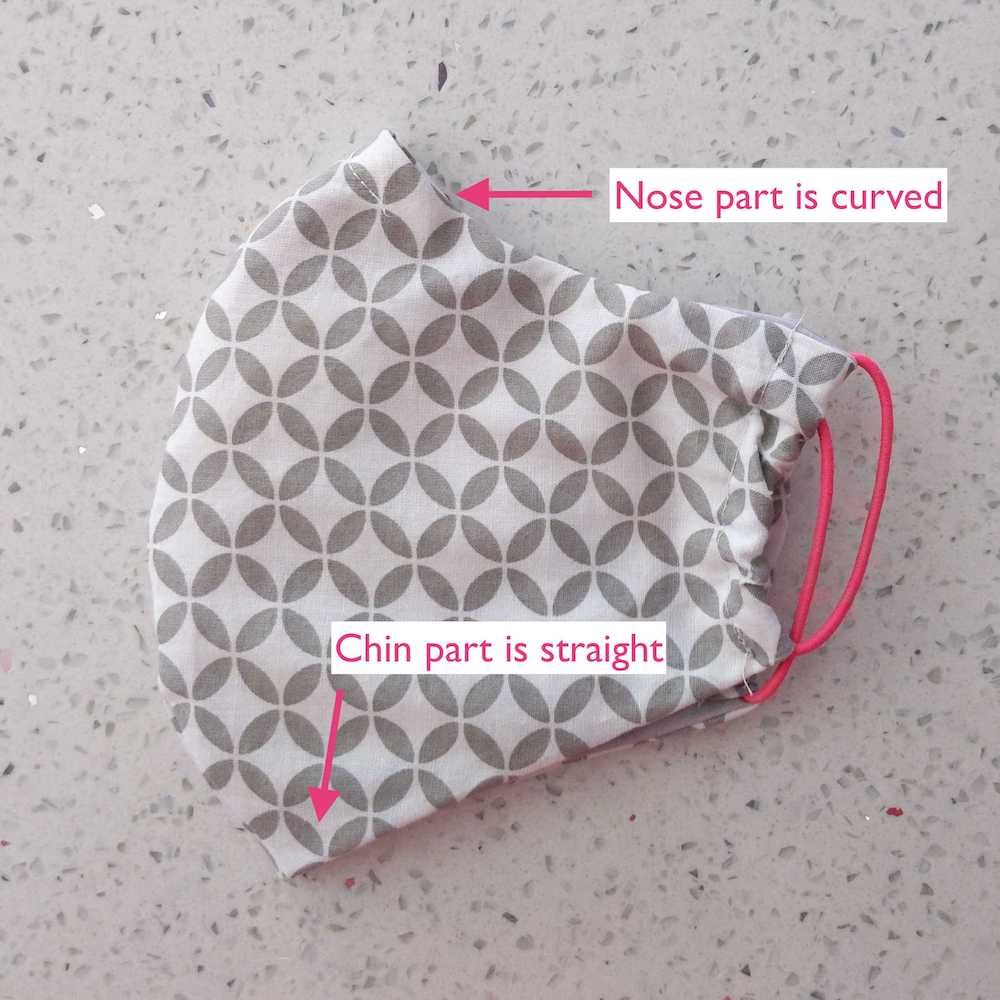
The Olson mask pattern has a curved section that goes over your nose and a flat section over your chin. In my experience, these make a pretty good fit.
To find the nose side, look at the mask when it’s folded in two: the chin part is straight and the nose part is curved. Also, the nose part has the channel for the wire piece.
How do I put in the wire nose piece?
At the top of the mask you’ll see a 2-3” sewed line that creates a channel for a nose wire. You can use any kind of wire that you find comfortable and form fitting.
I’m providing a piece of pipe cleaner that you can use. You have the choice of:
- Folding it in half and twisting it before inserting it in the channel.
- Placing it full length in the channel, tucking the ends under the filter flaps.
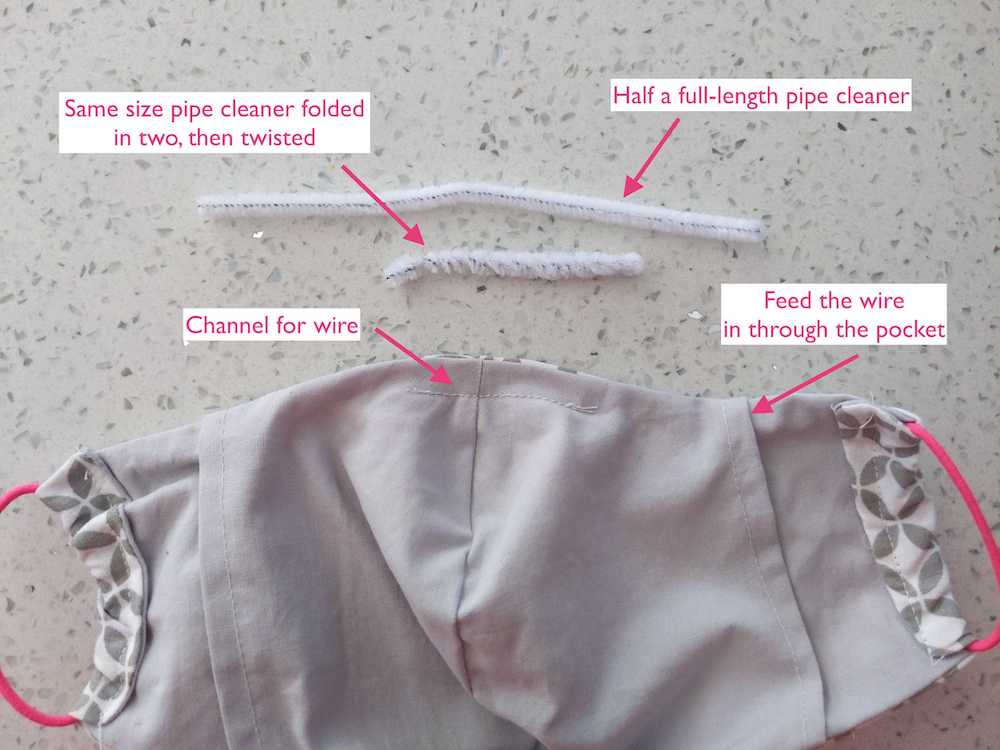
If the wire channel isn’t long enough for how you like to add your wire, you can sew it by hand to make it longer or to add extra “locking” stitches near the ears. You may need to trim your filter paper a bit if you do this, but it’s worth it for a great, personalized fit.
How do I use the filter?
I’m providing two Filti Fabric filters that you can put inside the filter pocket (remember their disclaimer!). These are completely optional and I make no warranties or claims about their safety, efficacy, etc. I use them, but that doesn’t mean they’re right for you. Read. Do your homework. And use at your own risk.
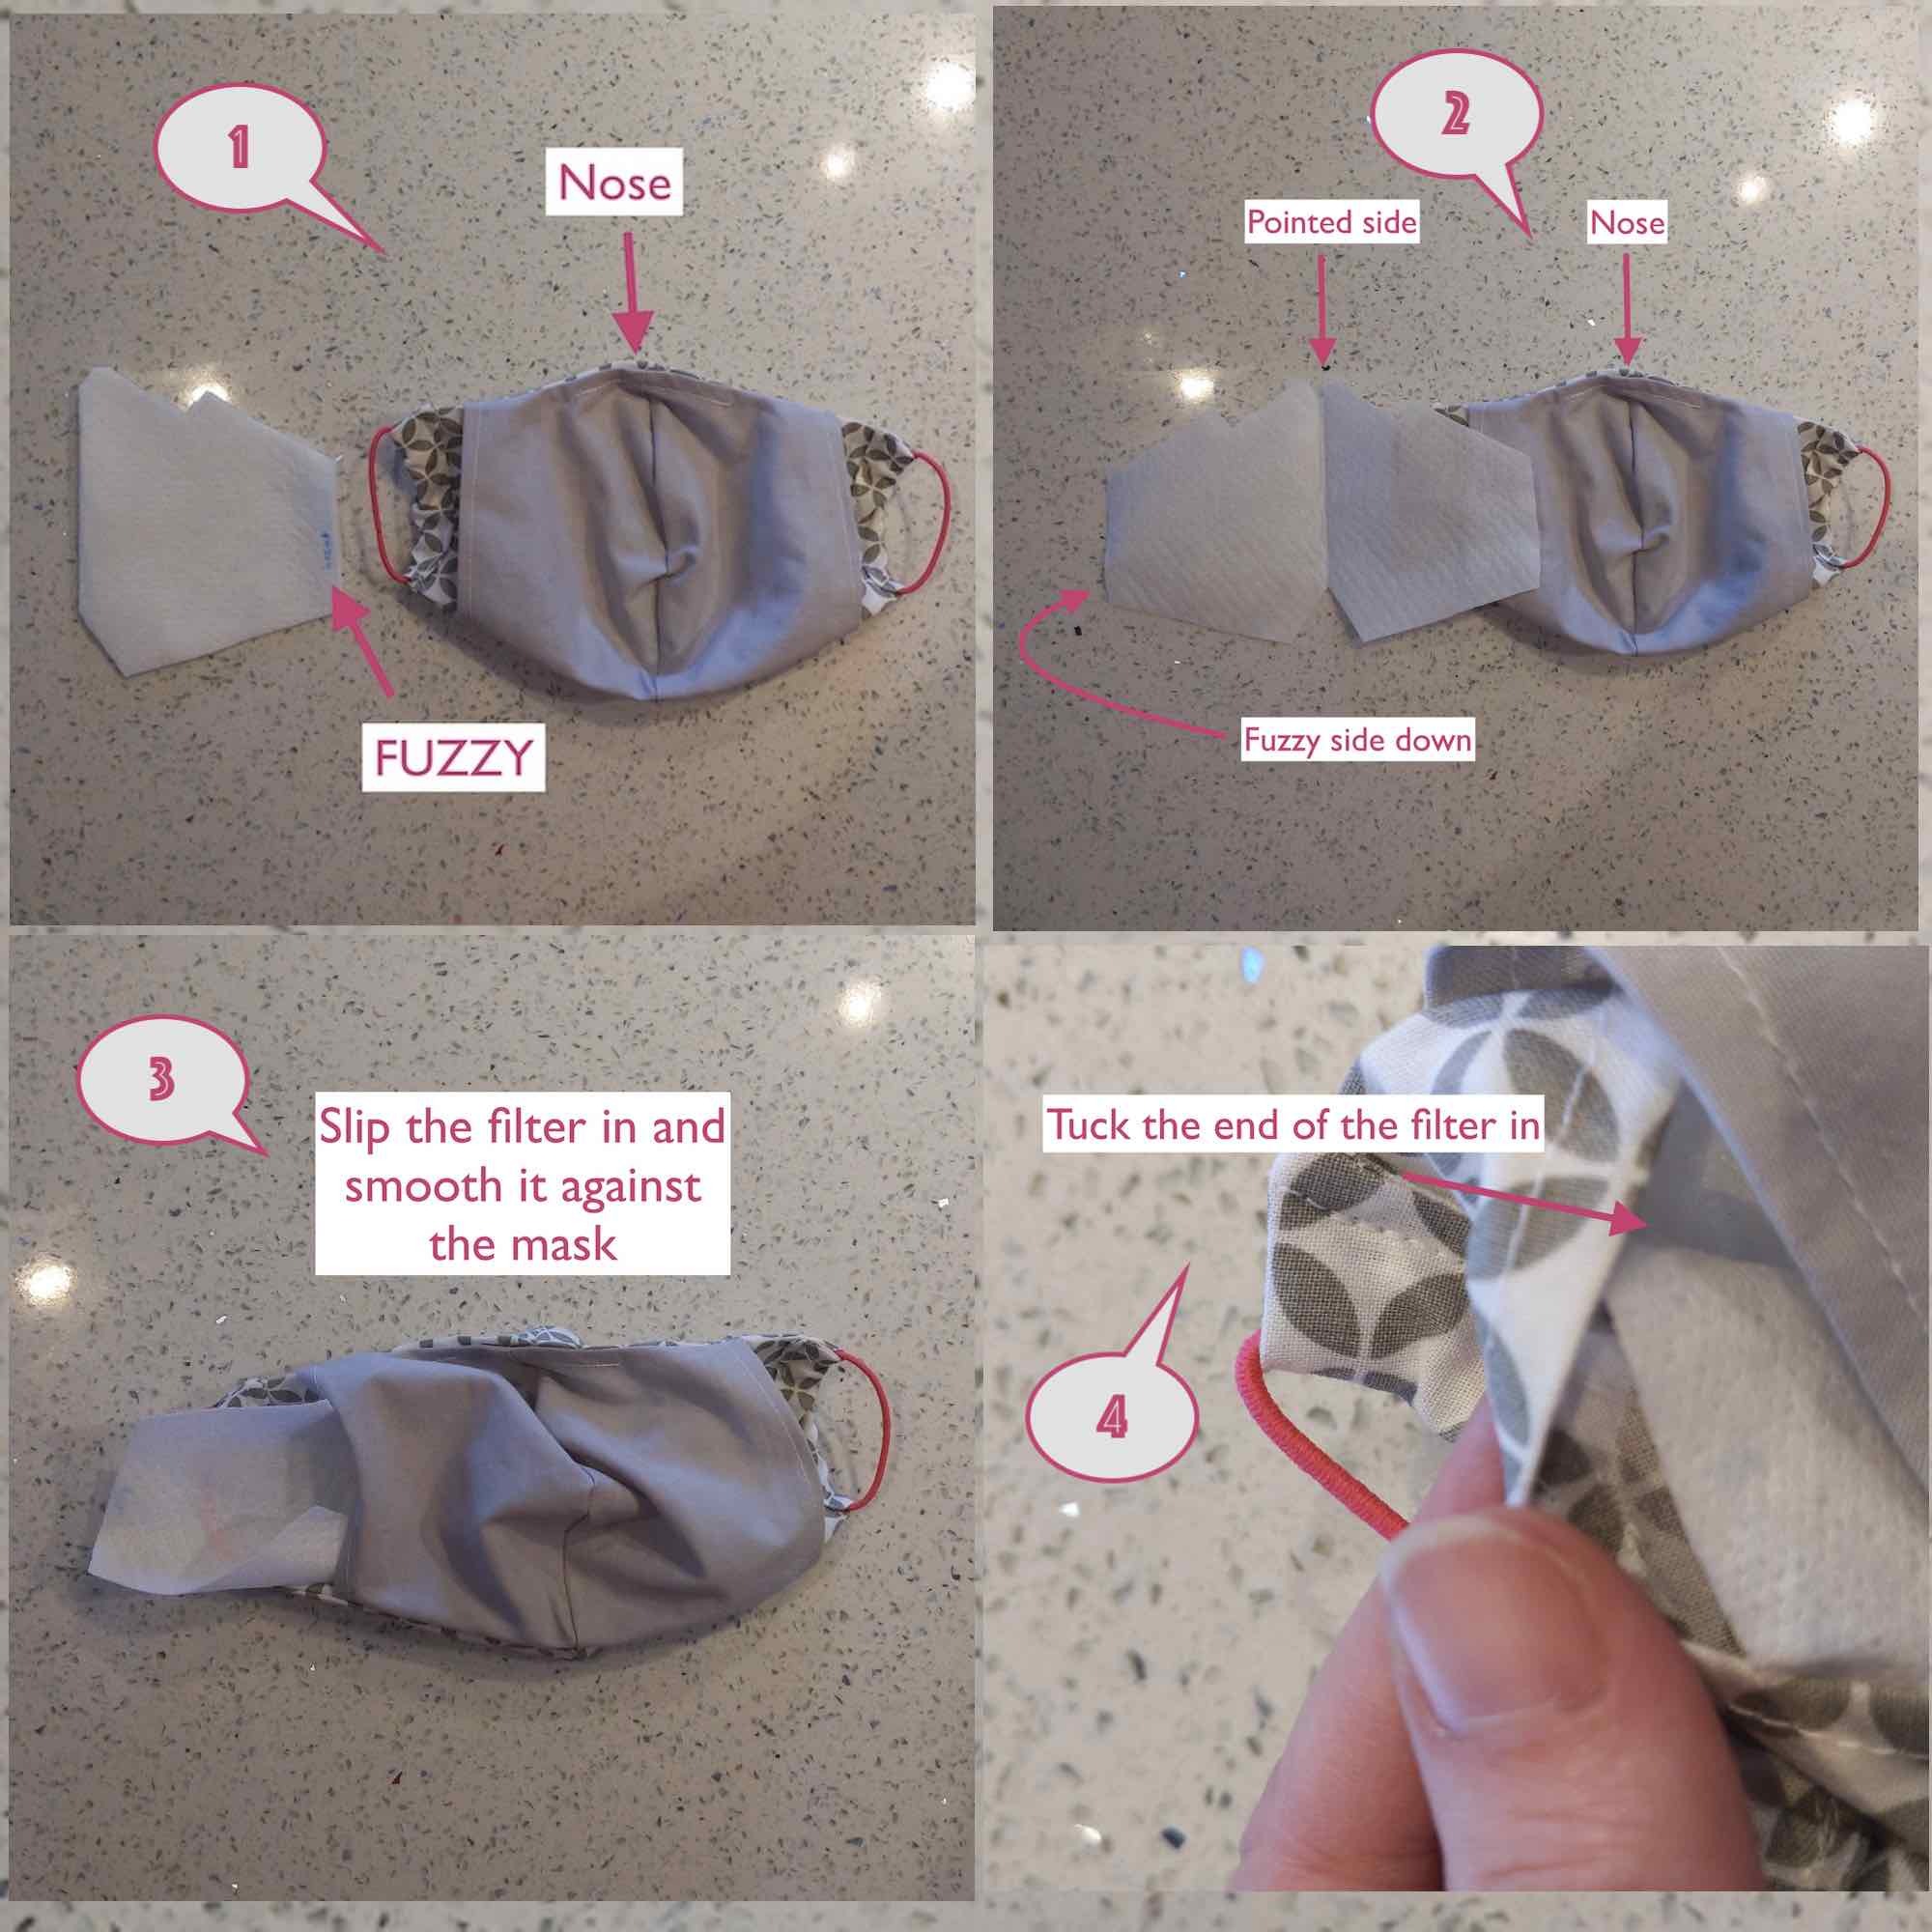
I’ve pre-cut the filter fabric to fit your mask. The Filti paper has an inside and an outside. Watch this quick video from the Filti team where they explain that the fuzzy side goes “out”. From what they say, using it this way makes the fabric better at its job. The fuzzy and smooth sides are pretty easy to tell by feel if your hands are clean and dry.
Place the fuzzy side towards the front of your mask and the smoother side towards the inside (mouth side) of the mask.
To put in the filter, start by washing your hands and finding a clean work flat work surface.
- Open the mask with the mouth side up and the nose side pointed it away from you. Look at your filter material and identify the fuzzy side (see my note below).
- Put the fuzzy side down on your work surface at the edge of the mask, with the pointier side facing in the same direction as the nose piece (this pointier side folds a bit to fit well in the nose).
- Gently fold the filter and slip it into the filter pocket, then and use your fingers to smooth it against the inside of the mask.
- Tuck the edges of the filter under the flaps at the ears.
Inserting the filter can take some practice.
What else can I use as a filter?
I’m (still) not a doctor or a scientist. I don’t know what long term effects you’ll experience from breathing through any type of filter media. I’m not endorsing or recommending any particular type of filter media, I’m only letting you know what I do.
One option, if you like it, is to purchase more Filti material directly from them. The fabric is made and shipped from the US. I didn’t have any issue buying from them, and it arrived fairly quickly (but with import fees).
You can also improvise another type of filter. The science behind different filter media is still evolving and is probably already out of date by the time I post this. So please do your own research.
Here is one article that shows the results of some scientific testing for different materials that could be used as a filter media. Remember that those materials have NOT been tested or proven safe to breathe through; the test was only for particulates and air passage (breathability). From my experience, I strongly recommend against using furnace filter paper - I had lung irritation when I tried this.
Personally, I’ve also used as filters:
- Paper towel (folded in a few layers)
- Blue shop towels (folded in two)
- A sanitized and cut up Winnie the Pooh flannel bedsheet (because I read that flannel can filter well when in combination with other fabrics).
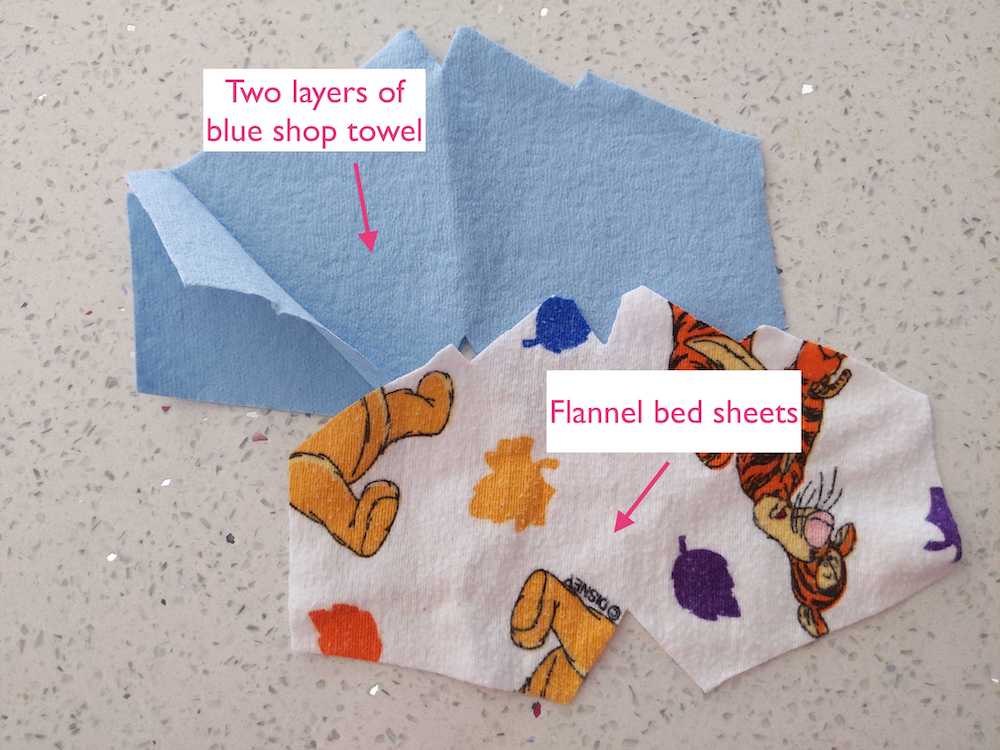
If you want to make a filter the same size as the one I provided, just trace it onto a paper template, then use the template to make more.
How should I care for and wash my mask?
Ideally we’d all have one-time use masks that we could throw out after contamination. But that’s not the case given today’s supply and demand problem, and the need to leave medical masks for people on the front lines of this fight.
Scientists are still working on the best ways to sanitize and re-use face masks. I don’t have all the answers and I encourage you to do your research. Here’s an article by the CDC that outlines some of the methods they’re testing for respirator sanitization and re-use.
The fabric shell of the mask I provided you is machine or hand washable, and will support very hot temperatures. The elastics however, may break down if repeatedly washed and dried at high heat. I put mine in the washing machine and in the dryer because it’s easy to replace the elastic if it wears out.
BUT make sure you take out the wire nose piece and the filter before washing. Filti has specified in their FAQs that their filter material shouldn’t be washed:
“It has been recognized by “Advanced Filtration Manufacturers Association (AFMA)” that advanced materials used in face mask filtration should not be washed due to the material damage and decrease in filtration quality.”
Based on the “Microwave generated steam” method described in the above-linked CDC document and also tested out by this lab, I’m mircowaving my own Filti filter for 2 mins over a glass pan of water to create steam. I don’t know if this meets the exact specifications of the CDC test and I am not saying that this will sanitize your filter.
Your absolute best bet is to throw away the used one and use a fresh filter. It’s up to you to decide how much risk you want to take. (Please don’t microwave the whole mask, especially if you have a nose wire inserted!)
THAT LAST SENTENCE IS WORTH REPEATING. IN ALL CAPS.
**VERY IMPORTANT: DON'T MICROWAVE THE WHOLE MASK, AND ESPECIALLY DON'T MICROWAVE ANY METAL LIKE THE PIPE CLEANER NOSE WIRE!!!!**
I hate these elastics, they hurt my ears!
I hear you. My ears hurt from the elastics on my mask too. I can’t imagine how much it must chafe for people who have to wear masks all day.
My recent masks are using a soft, stretchy elastic material. It still chafes after wearing, but it’s much better than the hair elastics I used initially.
Whatever ear “elastic” your mask has, I have not sewn the “elastic” to the mask. It’s sewn in place via a channel, but if you want to, you can replace it with something else. I strongly recommend cut strips from a cotton t-shirt, or soft cotton tights. Just thread the new “elastic” through the channel at the sides of the mask and cut off the existing hair or other elastic.
To thread the new elastic through the channel, I use a crochet needle. You could also use a large needle or a safety pin. Tie the new elastic in a knot (I suggest a reef knot or some other flat knot) and experiment to find the best placement of the knot so it doesn’t irritate your ears or face.
If you prefer long fabric ties instead of ear loops, you can replace the elastic bands with ties. You can hand (or machine) sew ties to the top and bottom of both sides of your mask (the recommended length is 18” for each tie), or you can slip a 36” tie through the channel where the elastic lives. The Fabric Patch’s video (queued up at the right spot) talks about different types of elastics and ties they’ve used. Even some ribbons and shoelaces work well. Go get inspired!